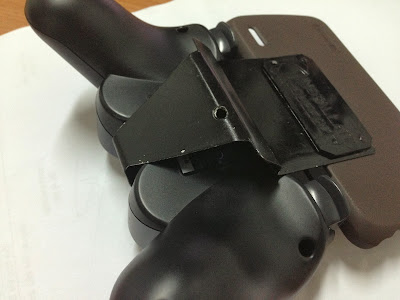
instructions for all Android devices running game with DualShock 3 professional with Sixaxis Controller
There were other presentations about Sixaxis Controller for PlayStation DualShock 3 hand connected with phones and tablets running Android then . Today I am your guide for more details on how to install , set up apps , how to clip the phone attached to the handle , the emulator PSP , PS1 ... for your Android device . And in this article , if you have any difficulties yet, I will try to add support for you .
Introduction :
- Sixaxis Controller is an application that help you easily connect with Play Station handles to control your Android device while playing games or using apps .
- Sixaxis controller can connect up to 4 devices at .
- Possible mappings for each key press for each position , each function for each respective game .
- Connect via Bluetooth or holding a mini - USB cable .
- ... and many other features are waiting for you to discover , more video:
- Must be running Android 3.1 or higher from
- Sixaxis Controller was running as root will require SU rights .
- Handles PlayStation . Encourage use genuine , but can also work with a few fake hand .
Guidelines to check compatibility :
Since the software does not work with all devices available on the market so we are required to check before you run out to buy . I think you should give a few dollars to buy a great app like this to generate funds for programmers to continue to develop more and better applications .
- Using Sixaxis Compatibility Checker software ( free on Google Play ) to check .
- Once installed , open the software on the Start button . If the message appears " Error : Missing required protocol '' means your device is not supported .
Guide PS connection handle :
On the phone :
- Install the Sixaxis Controller app ( here )
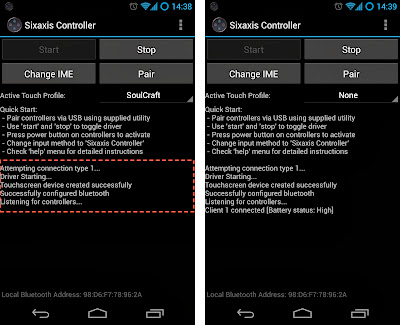
- Open Sixaxis Controller app , press the Start button and wait for startup applications . SU grant if the application requirements .
- Once booted , the bottom of the screen will display a series of Local Bluetooth Address ( form 1A : 2B : 3C : 4D : 5C : 6E ) vary per machine . You remember the sequence to move to the next step .
- If you are using Windows , download the application SixaxisPairTool ( here )
- If you use Mac OS ,
- PS Connect handles the computer using the mini - USB port .
- Open SixaxisPairTool applications . In the box you enter the Master Change Local Bluetooth Address address earlier on the phone , and then click Update . As in the Current Master that will change the sequence number you entered .
The illustration found on your network MacOS sketchy , but does not have a win here .
When set, the memory fill you right range for Bluetooth Address
PS On hand :
Press the ON button ( PlayStation logo button ) to put his hand into pair mode ( 4 lights will blink efficiency constant ) .
Observations on the phone until you can see " Client 1 connected [ Battery status: ... ] ." At that time the effect of light on the handle PlayStation 1 red light is connected successfully .
How to Create a profile and mapping for the game .
Touch Emulation emulator will help us to manipulate on-screen touch sensors , we will use it to control the game at will.
Advanced options for the emulator keys :
In some games require complex operations , the Sixaxis Controller still supports you customize keyboard emulator for the optimal game conditions .
Click on button 2 times to adjust to open the menu = > select Button Properties = > Button Properties window will appear with the settings depending on the nature of each node .
Open Sixaxis Controller , press Option ( mark ... the upper right corner of the screen) = > Preferences = > Application Profiles = > Profiles Manager = > Create Name = > Name Name ( same name encouraged to ask for manageable Game ) . At this new profile was created .
Select the newly created Profiletrong :
Model Name :
The profile you can share the game at this topic , I will update here . After downloading profile ( with file formats . Map ) , copy to the memory card path : " data / com.dancingpixelstudios.sixaxiscontroller / profiles "
Modern Combat 4 : http://www.fshare.vn/file/H4VQ7VJXNZ/
Some basic settings for use with hand- held PlayStation :
1. Graphics : game may vary , depending on machine configuration , long after the game is higher than 30fps is quite smooth
Click Download ATRAC3 + plugin = >
Game for PSP you can find easily online . I would like to share my 2 site often used:
PS1 emulator ( PSX ) :
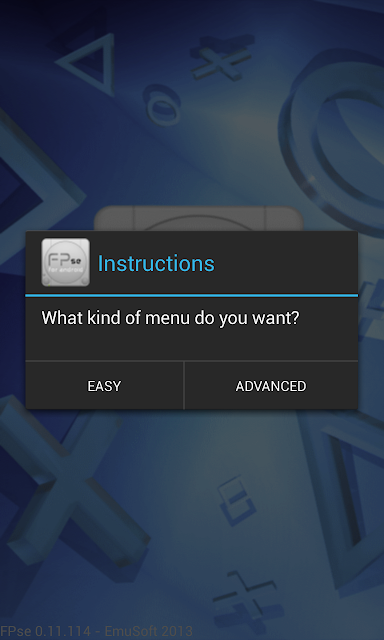
For PS1 emulator on Android also supports many applications , most notably 2 FPse for Android app ( here ) and PSX4DROID . In this article I will use Google Play FPse purchase .
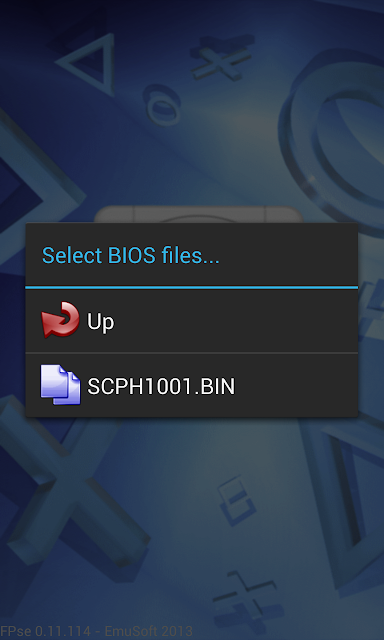
After installing FPse , you can now download the BIOS file ( SCPH1001.BIN - here ) to be able to save the game and the set, each time playing out with each adjustment .
The basic setup for FPse :
1. First, you should create a folder on the memory card 1 FPse . In this folder you will create 3 subfolders including ROM , BIOS , Save
2. LOAD BIOS : BIOS file you select ( SCPH1001.BIN ) was copied to a memory card .
3. SETTING : This section consists of 3 parts we touch : VIDEO , GAMEPAD , MISC .
MISC : we will edit this section before
Find and download PS1 games :
PS1 games are also very much on the network share . I also would like to introduce yourself or use the site to download games :
How to Create a profile and mapping for the game .
Touch Emulation emulator will help us to manipulate on-screen touch sensors , we will use it to control the game at will.
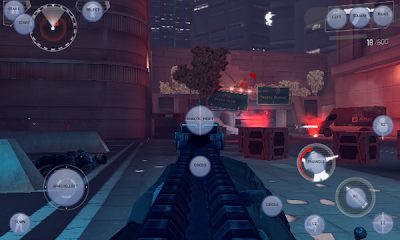
- First open the game to play , the play of the game screen to take the place of the touch pad ( the game screen capture ) . Then exit game
- Open Sixaxis Controller , press Option ( mark ... the upper right corner of the screen) = > Preferences = > Touch Emulation = > Edit Profiles Touch
- In the Profile settings screen , press 2 times the screen to open custom menu :
- Click the Change button and select the background image to create game screenshots .
- Click the Add button , select button and drag to the position corresponding to the function in the game that you want
- After setup is complete , click Save Profile and named for easy selection later .
- Click the Back button to exit the setup screen , go to the main screen of the Sixaxis controller .
- In the Active Touch Profile you just created to select the correct profile to use .
- Go back and enjoy the game .
In some games require complex operations , the Sixaxis Controller still supports you customize keyboard emulator for the optimal game conditions .
Click on button 2 times to adjust to open the menu = > select Button Properties = > Button Properties window will appear with the settings depending on the nature of each node .
- Analog Button Properties :
- Relative Touch : relative positions , are not restricted on the screen ( such as moving operations perspective in Mordern Combat 4
- Digital Button Properties :
- Touch Mode : simulate the sliding my finger across the screen to the left , right, up , down on the screen . ( just manipulating " exchange guns " in Mordern Combat 4 )
Elective Profile corresponding to the game .
In guided his steps on how to create profiles and select the game profile . Now I 'll show you how to customize the application to choose the correct profile was created on when you open the game .Open Sixaxis Controller , press Option ( mark ... the upper right corner of the screen) = > Preferences = > Application Profiles = > Profiles Manager = > Create Name = > Name Name ( same name encouraged to ask for manageable Game ) . At this new profile was created .
Select the newly created Profiletrong :
- Application : select game
- Touch Profile : select the appropriate profile
- Use native gamepad :
- Choose : if run the emulator application ( PPSSPP , FPse , PSX4Android ... )
- Uncheck if the game exclusively for Android
Model Name :
The profile you can share the game at this topic , I will update here . After downloading profile ( with file formats . Map ) , copy to the memory card path : " data / com.dancingpixelstudios.sixaxiscontroller / profiles "
Modern Combat 4 : http://www.fshare.vn/file/H4VQ7VJXNZ/
PSP emulator :
The best PSP emulator currently PPSSPP ( www.ppsspp.org ) , a project to help free PSP emulator on Android , iOS , Windows , Linux , MacOS , Blackberry , Symbian ... You can download the free Google Play PPSSPP ( or click here for quick ) .Some basic settings for use with hand- held PlayStation :
1. Graphics : game may vary , depending on machine configuration , long after the game is higher than 30fps is quite smooth
- Frameskipping : Auto
- Force 60 FPS max : check
- Alternative speed : Unlimited
- Antialiasing ( anti-aliasing ) : choose - too weak machine is ignored
- Show FPS counter : FPS for easy track selection while playing .
Click Download ATRAC3 + plugin = >
- Download and install = > wait until the process is completed 100 % = > click Back to go back out .
- Control Mapping : Click on each item , then press the corresponding button on the handle to set PS
- On- screen touch controls : uncheck to hide the virtual keyboard on the screen when the game
Game for PSP you can find easily online . I would like to share my 2 site often used:
- emuparadise : www.emuparadise.me/Sony_Playstation_Portable_ISOs/44
- pspshare.org : www.pspshare.org
PS1 emulator ( PSX ) :
For PS1 emulator on Android also supports many applications , most notably 2 FPse for Android app ( here ) and PSX4DROID . In this article I will use Google Play FPse purchase .
After installing FPse , you can now download the BIOS file ( SCPH1001.BIN - here ) to be able to save the game and the set, each time playing out with each adjustment .
The basic setup for FPse :
1. First, you should create a folder on the memory card 1 FPse . In this folder you will create 3 subfolders including ROM , BIOS , Save
2. LOAD BIOS : BIOS file you select ( SCPH1001.BIN ) was copied to a memory card .
3. SETTING : This section consists of 3 parts we touch : VIDEO , GAMEPAD , MISC .
MISC : we will edit this section before
- Select SaveState path : select the Save folder
- Video mode: If you configure powerful graphics chip that supports OpenGL script , you select the item Hight Definition OpenGL . If the key is configured to ignore .
- Framelimiter level : choose 60 , is not it also be customized to Auto configuration .
- This adjustment is complete in MISC section you should exit the application stores the option to take effect.
- Framelimiter : check
- Frameskip : check
- Print FPS : check for reference
- Enti Aliasing ( anti-aliasing ) : CHEC always , snacks that
- Gamepad Type : Digital pad
- Overlay Gamepad :
- Gamepad skin : Disable to hide the virtual buttons on the screen gaming
- Done , get applied again to the work setting .
Find and download PS1 games :
PS1 games are also very much on the network share . I also would like to introduce yourself or use the site to download games :
- emuparadise : www.emuparadise.me/roms/psx/
- Romulation : www.romulation.net/
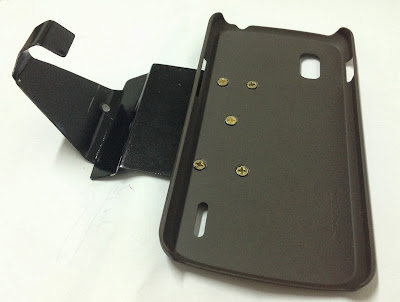
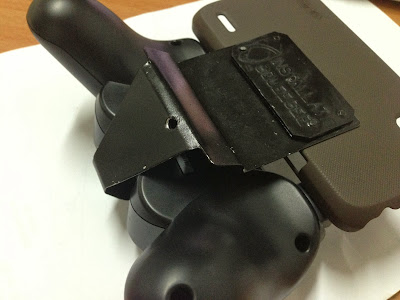
Guide to making clip attached to the handle PS phone
Materials needed:
- Paneled back plastic (plastic as possible) to fit the phone. Find any kind, but certainly not easy to dismantle.
- 6 ring head screws though pake (short)
- 1 piece of thin aluminum
- The aluminum cutting scissors
- Paint Box ATM
- Sandpaper for abrading the aluminum surface before painting
- 1 piece of thick plastic (to catch screw from case)
- The image you see before hand dimensioning follow.
Reference source: Tinhte


